TOGAF 10: Understanding the 7 Core Concepts
Introduction
TOGAF 10, the latest version of The Open Group Architecture Framework, is a crucial tool for IT companies and organizations looking to streamline their enterprise architecture practices. This article explores the seven core concepts of TOGAF 10, providing a comprehensive understanding of how they contribute to the efficient management and development of enterprise architecture.
1. Definition of Enterprise
In the context of TOGAF, the term “Enterprise” refers to any organization or group of organizations with a shared set of goals. This can include corporations, divisions within a company, partnerships, or any other entity with a defined mission. Enterprise Architecture (EA) involves the practice of analyzing, designing, planning, and implementing the architecture of the enterprise to achieve these objectives.
2. Architecture Domain (BDAT)
TOGAF divides enterprise architecture into four primary domains, collectively known as BDAT:
Business Architecture
Business Architecture focuses on business requirements. It outlines the structure and operation of an organization, including business goals, functions, processes, and organizational structure.
Data Architecture
Data Architecture pertains to the management of data, both physical and logical. It involves data assets, databases, data models, and the governance of data across the enterprise.
Application Architecture
Application Architecture describes individual applications and their interactions. It addresses software applications and their role in supporting business processes and functions.
Technology Architecture
Technology Architecture involves the IT infrastructure, including hardware, software, networks, and services. It ensures that the infrastructure supports the application and data requirements of the business.
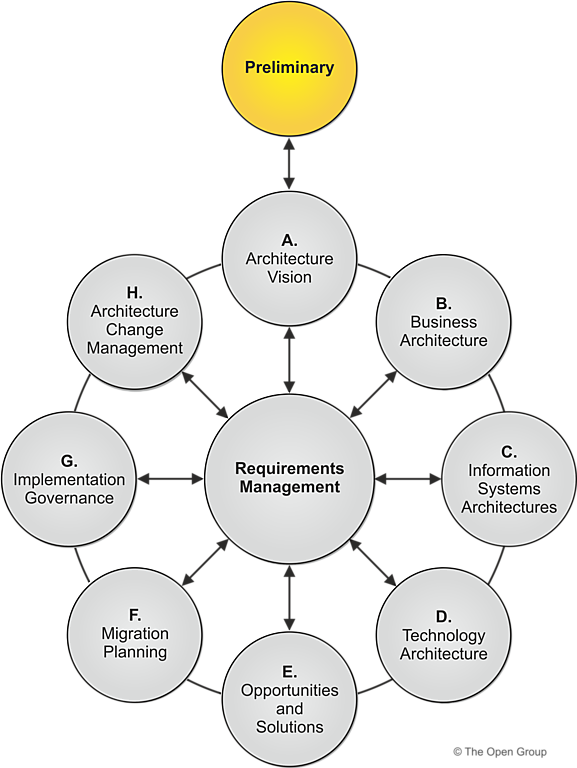
3. ADM (Architecture Development Method)
The Architecture Development Method (ADM) is the core of TOGAF. It provides an iterative approach to developing and managing enterprise architecture, consisting of the following phases:
Preliminary Phase
Preparation and definition of the architectural framework.
Phase A: Architecture Vision
Establishing the architectural vision to align stakeholders and define the scope.
Phase B: Business Architecture
Developing the business architecture to understand the structure and operation of the organization.
Phase C: Information Systems Architectures
Creating data and application architectures that support business processes.
Phase D: Technology Architecture
Developing the technology architecture to ensure the IT infrastructure meets the needs of the business.
Phase E: Opportunities and Solutions
Identifying opportunities and solutions for improvement and innovation.
Phase F: Migration Planning
Planning the migration from the current state to the target architecture.
Phase G: Implementation Governance
Governing the implementation to ensure alignment with the architectural vision.
Phase H: Architecture Change Management
Managing changes to the architecture to maintain alignment with business goals.
Requirements Management
Continuous management of requirements to adapt to day-to-day changes.
4. Deliverables, Artifacts, and Building Blocks
Deliverables
Deliverables are formally released and approved outcomes of each phase, such as reports, architectural models, and design documentation. They provide specific input to subsequent phases or meet stakeholder needs.
Artifacts
Artifacts include models, diagrams, and documents that describe specific aspects of the architecture. They serve as means of communication and documentation for various stakeholders and can be catalogs, matrices, or diagrams.
Building Blocks
Building Blocks are reusable architecture components that can be combined to create more complex solutions, ensuring consistency and efficiency in architecture development.
5. Enterprise Continuum
The Enterprise Continuum is a conceptual model for classifying and organizing architectural artifacts. It includes:
Architecture Continuum
Covers architectures from specific to general, providing a framework for developing and maintaining a comprehensive set of architectures.
Solutions Continuum
Covers technology solutions and their implementations, ensuring alignment with the architectural vision and business needs.
6. The Architecture Repository
The Architecture Repository is a structured repository containing all information relevant to the enterprise architecture, including:
Metamodel Content
Metadata definitions that provide a framework for understanding and managing architecture data.
Architecture Landscape
Current, target, and transition architecture models that provide a comprehensive view of the enterprise architecture.
Reference Library
Reference models, guidelines, and best practices that support architecture development and governance.
Standards Information Base (SIB)
Architecture standards and guidelines that ensure consistency and compliance across the enterprise.
Governance Log
Logs of architectural governance decisions, ensuring transparency and accountability in architecture management.
7. Architecture Capability
Effective enterprise architecture requires a set of capabilities, including:
Organization
Organizational structures and roles that support the architecture.
Processes
Processes for developing, governing, and managing the architecture.
Information
Data and information necessary to support architectural decisions.
Tools
Software tools and technologies that facilitate architecture development and management.
Skills
Skills and training required for personnel involved in architecture, ensuring they have the expertise to develop and manage the architecture effectively.
FAQs
What is the purpose of TOGAF?
TOGAF provides a framework for developing, managing, and governing enterprise architecture, ensuring alignment with business goals and efficient use of IT resources.
How does TOGAF define an enterprise?
In TOGAF, an enterprise refers to any organization or group of organizations with a common set of goals, including corporations, divisions, partnerships, and other entities with a defined mission.
What are the four domains of enterprise architecture in TOGAF?
The four domains are Business Architecture, Data Architecture, Application Architecture, and Technology Architecture, collectively known as BDAT.
What is the ADM in TOGAF?
The Architecture Development Method (ADM) is the core of TOGAF, providing an iterative approach to developing and managing enterprise architecture through various phases.
What is the Enterprise Continuum in TOGAF?
The Enterprise Continuum is a conceptual model that helps classify and organize architectural artifacts, including the Architecture Continuum and Solutions Continuum.
Why is an Architecture Repository important?
The Architecture Repository is essential for storing all relevant information about the enterprise architecture, ensuring consistency, accessibility, and effective management.
Conclusion
Understanding the seven core concepts of TOGAF 10 is essential for any IT company or organization looking to streamline their enterprise architecture practices. By leveraging TOGAF’s comprehensive framework, businesses can ensure their architecture aligns with their strategic goals, improves efficiency, and supports innovation.